


Can You Paint Pressure Treated Wood? Tips That Worked For Me!

Oftentimes, when you’re building a deck or fence, pressure-treated wood is going to be the material of choice.
It’s basically normal wood that’s been infused with chemical preservatives that protect it from rot, decay, and insect damage.
It is, therefore, naturally the best material for any outdoor project, such as pergolas and garden furniture.
Since it’s so tough, it only seems logical to transform it a bit and add some color by painting.
And you can do it, but it has to be the right way. However, unlike ordinary wood, pressure-treated lumber is typically soaked in fluids and chemicals right out of the factory.
So, if you paint them immediately, the moisture will want to escape the wood, causing your paint to bubble or peel.
To achieve a durable, professional finish, make sure the wood is thoroughly dry and use the right primer.
In this blog, we will share the best steps to ensure your lively-colored creation maintains its beautiful look for many years.
Can You Paint Pressure Treated Wood?

Yes, one can paint pressure treated wood; however, a condition is attached. Initially, pressure-treated wood is loaded with chemical preservatives and high moisture content from the factory.
It means that if one paints the wood immediately, the paint will not adhere properly and will peel and blister over time.
Simply put, the wood needs to be dried before painting. It normally takes weeks to months for the wood to fully dry.
Often, around 3-4 months is the average period under normal circumstances. To check, wet the surface a bit: if the water is absorbed instead of forming droplets, the wood is quite dry.
After this drying process, make sure the surface is clean, then apply a good-quality exterior primer, and finally, a durable exterior paint.
The paint job will be more durable and longer-lasting.
When Should You Paint It?
It is possible to paint pressure treated wood, but not immediately. In fact, pressure-treated wood is soaked in water during the treatment process.
Now, if you paint it too soon, the paint will not stick and will peel or bubble later. Therefore, you first need to let the wood dry thoroughly.
Typically, this involves waiting 3 to 6 months after the wood is installed or purchased, especially in a humid climate.
During this period, moisture and chemicals are released from the wood, and it is ready to receive primer and paint.
You can shower a little water on the surface to check that the wood is ready.
If the water is absorbed instead of forming droplets, it is a sure sign that the wood is sufficiently dry for painting.
In other words, hold off painting pressure wood till it is dry, generally a few months, for a nice finish.
Painting Vs. Staining: Making The Right Choice

Choosing to paint or stain pressure treated wood is mostly a matter of deciding on:
- What kind of finish do you want?
- How much work are you willing to put into maintaining it?
Both paint and stain are protective layers, but they serve different purposes. You just need to follow these:
1. Paint Provides A Powerful, Solid Color.
It forms a layer on the wood, resulting in a smooth, uniform surface. That is why it hides defects quite well.
On the other hand, it requires proper prep work, including primer, and may chip or peel over time.
2. Stain Gets Into The Wood Fibers.
Rather than masking the surface, it brings out the wood’s natural grain. If you’re after a natural, rustic appearance, staining is an excellent option.
3. Paint Gives You A Lot More Color Freedom.
You can virtually match any style. On the contrary, stain offers fewer color choices but has a natural and fresh vibe.
4. Stain Is Less Of A Headache In Maintenance.
Because it goes through the wood, it’s less prone to peeling. However, you might have to put it on again when it loses its color.
Ultimately, go for paint if you want bright color and coverage, and go for stain if you’re after a natural appearance and easy maintenance.
Preparation Steps Before Painting: What You Need To Follow?
Before painting pressure-treated wood, make sure you follow these step-by-step instructions for the paint to stick and last:
1. First, Check If The Wood Is Dry.
Pressure-treated wood is generally wet at the time of purchase. Spray some water on the surface. If it gets absorbed, the wood is ready. But if droplets form, it’ll have to wait longer.
2. Next, Clean The Surface.
Using mild soap and water, remove dirt, dust, and any remaining chemicals. Afterward, allow the wood to dry thoroughly.
3. After That, Sand Rough Spots.
Lightly sand any rough areas to ensure the primer adheres well. Completely remove all sanding dust by wiping with a clean cloth.
4. Then, Put On A Primer.
Apply a high-quality outdoor primer designed for pressure-treated wood. This will help the paint adhere well and prevent peeling.
5. Finally, Paint With Thin Layers.
Use two thin coats of outdoor latex paint, allowing each to dry according to the manufacturer’s instructions.
What About The Cost?
If you decide to do it yourself, a primer can typically be $15$25 per gallon, and paint may be $20$40 per gallon.
Brushes, rollers, and sandpaper might add another $15$30. In total, you may spend $50 or more, depending on the size of your project.
Painting Process & Best Practices

Painting pressure-treated wood cannot only up the style quotient of your project but also give it a shield against the elements.
That is, unless you dont follow the steps correctly, your painting won’t last. Here is a simple procedure that takes you through the entire painting process.
Only Time Can Tell
The first thing to do is to wait. Pressure-treated timber is usually damp when fresh, hence paint will not adhere properly if the wood is still wet.
So, before you put on any paint, make sure the wood is fully dry. If you wish, use a few drops of water and sprinkle them on the surface.
Now, if the water droplets are absorbed rather than remaining on the surface, then the wood is ready to be painted.
Lastly, if the water beads up, you would be better off waiting and testing again later.
Make Sure To Thoroughly Clean The Wood
Once the wood is dried, it is important to clean it properly. Particles such as dirt and dust, along with chemical residues from wood treatment, may prevent your paint from sticking.
Therefore, use a stiff brush with a mild soap and water mixture to wash the boards. After that, rinse the soap thoroughly and let the wood dry again.
Make It Smooth By Sanding
After the wood has been cleaned and dried, you can gently rub the rough areas with fine- to medium-grit sandpaper.
Sanding makes the surface smoother and gives the primer something to grip on. When you’re done, wipe away the sanding dust with a clean cloth.
Apply A Good Primer
Next, apply a good-quality exterior primer! Especially one that is compatible with pressure-treated lumber.
A primer helps increase paint adhesion and helps prevent peeling afterward.
Follow all directions on the label, including the waiting time between coats of primer.
Paint In Thin, Even Coats
It’s time to paint now. Choose an exterior latex paint and put on two thin coats instead of one thick coat.
Thin coats dry more quickly and are more durable, and they also help minimize drips or uneven color. Each coat has to be completely dry before the next can be applied.
Best Practices For Long‑lasting Results
To make sure your paint job on pressure treated wood lasts as long as possible, follow these simple tips. These small steps can prevent peeling, fading, and uneven color over time:
Choose the right weather. Ideally, paint on a dry day with mild temperatures — not too hot or cold, so the paint dries well.
Work with the grain. Brush or roll in the direction of the wood grain for a smoother, more natural finish.
Check edges and ends. These areas dry faster and may absorb more moisture, so give them extra attention with primer and paint.
Maintain over time. Pressure-treated wood can expand, shrink, and weather with the seasons, so check your paint every year and touch up spots that start to wear.
What Are The Common Mistakes & How To Avoid Them?
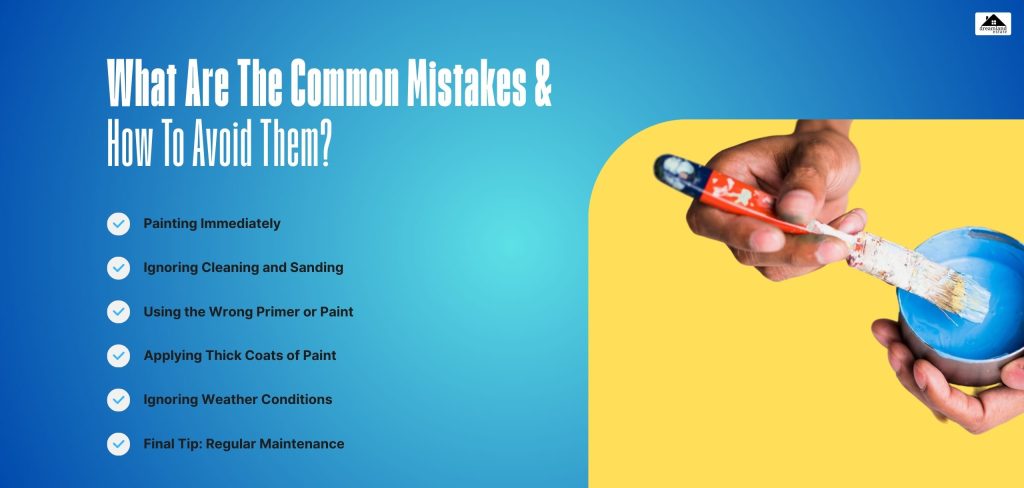
It is generally a good idea to repaint pressure treated wood to make your work appear stylish and durable at the same time.
Unfortunately, many people are falling into the trap of making mistakes, which in turn spoils the finish layer of paint.
Outlined are issues individuals commonly face, along with ways to prevent them that require little effort on your part.
1. Painting Immediately
Most individuals, after purchasing or treating pressure-treated wood, attempt to paint it without allowing it to dry.
The issue is that sometimes this wood is left with moisture, and thus preservative chemicals, which prevent paint from sticking to it.
How to Avoid: Firstly, the wood should be dried completely. One way to check whether your wood is dry is to sprinkle some water on its surface.
If it absorbs right away instead of forming drops, it means the wood is ready to be painted.
The paint will stand better without moisture when the wood has been left for a time to allow moisture to escape.
2. Ignoring Cleaning and Sanding
Whenever you cover dirt, dust, or sharp edges with paint, the paint will not stick well and may appear uneven or peel off later.
How to Avoid: Before painting, the wood surface should be thoroughly cleaned with simple soap and water, then rinsed with water to remove dust and any adhered chemicals.
The abrasive paper should be utilized to smooth sharp edges. After an area is sanded, the dust on the surface is wiped off with a clean cloth before proceeding to priming and painting.
3. Using the Wrong Primer or Paint
Many people use whatever primer or paint they come across, or they even paint without priming. Primarily, such a finishing work results in peeling or fading.
How to Avoid: Get an outdoor primer compatible with pressure-treated wood, then finish it off with a fine-quality exterior latex paint.
Primer is a base that helps improve the adhesion and durability of paint. Always follow the manufacturer’s directions.
4. Applying Thick Coats of Paint
Painting in thick layers may seem like a quicker way to finish the job, but they dry only on the surface, drip, and are more prone to cracking over time.
How to Avoid: On the contrary, apply thin layers of paint one at a time, waiting until each layer dries before applying the next.
Thin layers dry more quickly, making the paint appear smoother and more professionally applied.
5. Ignoring Weather Conditions
Dont paint surfaces that will be exposed to rain, high humidity, or very hot/cold weather, since this will hinder the paint from drying properly. As a result, the paint will not stick well, and the finish will be rough.
How to Avoid: Make sure you paint only when the day is dry and the temperature is not extreme. Nice weather facilitates paint drying and strong bonding to wood.
Final Tip: Regular Maintenance
Even when you avoid all these mistakes, outdoor paint will wear down over time from the sun, rain, and temperature changes.
So it’s a good idea to check your painted wood once in a while and touch up any spots that start to peel or fade.
Regular upkeep keeps your wood looking great and protected longer.
Maintenance & Longevity
So, if you dont want your pressure-treated wood to turn into a weathered piece of junk and keep it strong, you pretty much have to focus on maintenance.
It’s treated chemically, so it doesn’t rot or attract insects, but the wood surface can still be damaged by the sun and rain.
Keep It Clean
Usually, you’ll want to wash your wood at least once a year. Get a soft deck cleaner and a brush to clean the wood surface of dirt, pollen, and even mildew.
If you decide to use a pressure washer, be gentle with the setting so you dont rip the wood fibers.
Sealing And Painting
To really extend the life of your wood, consider reapplying a water-repellent sealer or repainting every few years.
Sealers: Normally, these need to be refreshed every 12 years.
Paint: With a high-quality exterior latex paint, it can last 57 years, but if you notice any chips, do the touch-up early so moisture doesn’t get under the surface.
Quick Longevity Tips
Inspect Annually: Check for loose boards or “soft spots” that might mean rot is starting.
Watch the Water: Make sure water isn’t pooling on the surface. Good drainage is your best friend here.
By following these simple steps, your outdoor projects can easily last 20 to 40 years!


Leave A Reply